The Ecobee3 power extender kit is the ultimate solution to houses without a C-Wire. While the perfect solution to the problem is pulling a C-Wire, most homeowners skip this lengthy and sometimes professional process in favor of the simpler DIY solutions.
All smart thermostats need that C-Wire to run their Wi-Fi, keep their programming working and communicate with remote sensors. Running all these features on batteries will drain them too fast. The solution?
Power Stealing, a technology that lets the smart thermostat draw enough power from the control wires without triggering the HVAC system. This is one of the many ways to wire a thermostat without a conventional C-wire.
Using the power extender kit is mandatory if you use 2 wire only heating systems. The ecobee 2 wire installation procedure will either rely on this PEK installation guide or an alternative approach that uses the Fast-Stat common maker.
How Does the Ecobee PEK Work?
The Ecobee power extender kit uses the power stealing technology meaning that it will try to steal as much energy as it can from the HVAC control lines to recharge its batteries. The thermostat gets more energy when the system is off and gets less when it’s running meaning that the chances of failure are higher if your AC is almost ever running.
Installing the Ecobee3 Power Extender Kit
The Ecobee PEK needs a couple of steps to get up and running. The manufacturer advises you to discharge your body of any static electricity by touching a grounded metal object and never to touch the internal component but to grab the devices by the edges as they are susceptible to electrostatic discharge.
Installing the Wiring Harness
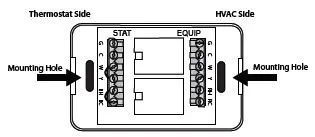
Choose an indoor dry location at most 24 inches (0.6m) from the HVAC equipment. Power off your HVAC and remove the cover on the wiring harness before using included screws to attach the wiring harness on a flat surface.

Installing the Diode
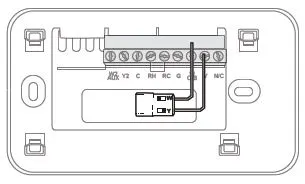
The diode goes behind the thermostat in the back panel wire opening. Pry your thermostat from the base and use its back panel wire opening as a guide to bend the diode wires to 90 degrees to allow them to fit into the W O/B and Y terminals.

Clip the diode legs so that they can fit perfectly into the terminals, screw them in place and place the diode into the recess behind the thermostat.
Connecting the Wires
This step links up everything in the system you’ve created using the Ecobee thermostat, the diode, wiring harness, and the HVAC equipment.
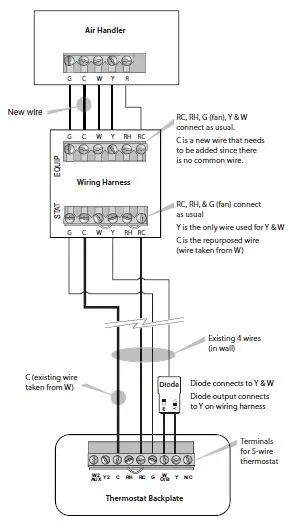
- Connect the C Wire from the thermostat to the C terminal on the STAT side of the wiring harness. If you don’t want to run new wires, repurpose the wire that connected to W on a 4-wire thermostat setting.
- Connect the RC/RH and G wires from the thermostat to the respective RC/RH and G terminals on the STAT side of the harness.
- Connect the output from the diode to the Y terminal on the STAT side of the wiring harness. For this, you can repurpose the Y wire on a 4-wire thermostat setting.
- Connect the RC/RH, G (FAN), Y, C and W wires on the EQUIP side of the wiring harness to the corresponding terminals on your HVAC equipment.
Your final connection should resemble this

Winding Up
You should be done with the procedure now and can reattach the thermostat to the backplate (make sure the pins on the thermostat align with and lock to the base plate) before powering on the HVAC. Your thermostat should automatically power up.
Test the wiring by running different settings to ensure everything works fine before covering the wiring harness’s front cover and cleaning everything up.
Remember that the Ecobee3 power extender kit is just but an effective power stealing circuit that could fail at given conditions. The only sure way to keeping your new smart thermostat running all day all year is by having a professional pull a dedicated C Wire from your HVAC equipment.

